Samba is a free and open source software that allows Linux and Unix-like operating system inter-operate each other with Windows. Samba provides file and print services for Windows clients and can integrate with a Windows Server domain. It can also be a part of Active Directory domain.
Running on most Linux and Unix-like system such as Solaris, BSD and Mac OS X server, Samba becomes a standard on nearly all distributions of Linux and included as a basic system service on other Unix-based system as well.
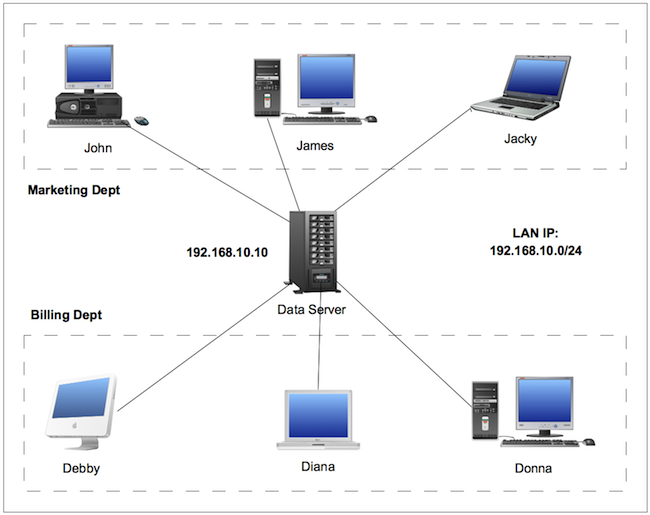
This post will focus on how to install and configure Samba in Linux. I am using Ubuntu server 12.10, however this should be applicable for other Linux distribution such as Redhat, Centos, Fedora, Debian, and Slackware with just different in the way how to install it. The scenario is based-on the diagram below.

In a company there are two departments: Marketing and Billing Department (this is just for example only). The marketing people are John, James and Jacky whereas the Billing people are Debby, Diana and Donna. So we will create Marketing and Billing folder in the Samba server to be shared.
John, James and Jacky have read/write access to the Marketing folder with read-only access to Billing folder. Debby, Diana and Donna have read/write access to the Billing folder with read-only access to Marketing folder. Each users also have its own Home folder to store their private documents so the Home folders are not browsable to make it more private.
In this tutorial, the Samba files will be stored in /data/samba directory. You can change this to meet your configuration.
Let’s go to the step by step:
Install the Samba
In Ubuntu / Debian varian:
$ sudo apt-get install samba
In Centos / Fedora / Redhat varian:
$ sudo yum install samba samba-common
In Slackware
$ sudo slapt-get -i samba
Create all the users and groups
We will create user and group of each user including the marketing and billing user and group.
# useradd john
# useradd james
# useradd jacky
# useradd debby
# useradd diana
# useradd donna
# useradd marketing
# useradd billing
Then set john, james and jacky into the marketing group and debby, diana, and donna into the billing group
# usermod -a -G marketing john
# usermod -a -G marketing james
# usermod -a -G marketing jacky
# usermod -a -G billing debby
# usermod -a -G billing diana
# usermod -a -G billing donna
Create the shared folders and set the permissions
In this tutorial, the shared folders are marketing and billing folders, so lets create those folders using super user privileges
# mkdir -p /data/samba/marketing
# mkdir -p /data/samba/billing
Then set the permission of the folders to each user and group
# chown -R marketing.marketing /data/samba/marketing
# chown -R billing.billing /data/samba/billing
Edit the /etc/samba/smb.conf
This is my configuration:
[global]
	workgroup = MYWORKGROUP
	server string = %h server (Samba, Ubuntu)
	map to guest = Bad User
	pam password change = Yes
	passwd program = /usr/bin/passwd %u
	passwd chat = *Entersnews*spassword:* %nn *Retypesnews*spassword:* %nn *passwordsupdatedssuccessfully* .
	unix password sync = Yes
	security = user
	syslog = 0
	log file = /var/log/samba/log.%m
	max log size = 1000
	dns proxy = No
	usershare allow guests = Yes
	panic action = /usr/share/samba/panic-action %d
	idmap config * : backend = tdb

[homes]
	comment = Home Directories
	valid users = %S
	read only = No
	create mask = 0700
	directory mask = 0700
	browseable = No

[Marketing]
	comment = Marketing Shared Directory
	path = /data/samba/marketing
	write list = @marketing
	read list = @billing
	force user = marketing
	force group = marketing
	read only = No
	guest ok = No
	create mask = 0755
	browseable = Yes

[Billing]
	comment = Billing Shared Directory
	path = /data/samba/billing
	write list = @billing
	read list = @marketing
	force user = billing
	force group = billing
	read only = No
	guest ok = No
	create mask = 0755
	browseable = Yes
Create Samba password for each user
Create samba password for all users except the marketing and billing user.
# smbpasswd -a john
New SMB password:
Retype new SMB password:
Added user john.
Repeat the command above to create Samba password for all users.
Run testparm to see the smb.conf is fine
# testparm
Load smb config files from /etc/samba/smb.conf
Processing section "[homes]"
Processing section "[Marketing]"
Processing section "[Billing]"
Loaded services file OK.
Server role: ROLE_STANDALONE
Press enter to see a dump of your service definitions
Run Samba service
We can run the Samba service using command below:
# /etc/init.d/smbd start
# /etc/init.d/nmbd start
Now you are ready to access the shared folder from Windows, Linux, or Mac.
Using Windows Explorer, try to access the Samba server using \<samba_server_ip_address><shared_folder>. Based-on the diagram above, type \192.168.10.10 marketing for the marketing directory or \192.168.10.10billing for the shared billing directory. You can also simply \192.168.10.10 in the address bar and then select the shared folder. Use your username and password to access the shared directory.
In Mac, use Finder to access the shared folder. In the Finder application, click the Go menu and the select ‘Connect to Server…’ and type ‘smb://192.168.10.10/’ in the Server Address bar.
In Linux, you can use Nautilus program and use ‘smb://192.168.10.10/’ to connect to the server.
I hope this simple tutorial is helpful for you on how to install and configure Samba for file sharing.