This tutorial will guide you on how to install JDK (Java Development Kit) on Linux. Since I use Centos 5.4 x86_64 in everyday life, this guide is showing you how to install JDK in Centos 5.4 64bit. It must work in any other Linux distro such as Slackware, Fedora, Ubuntu et cetera.
If you install a Linux OS, the developers usually already included a JVM to the system to run some programs that need Java. Mostly they included OpenJDK for the JVM.
But I don’t like to use OpenJDK because some Java platform like JavaFX will not run using OpenJDK.
UPDATE! Java SE 6 (JDK 1.6) Update 24 (file name: jdk-6u24-linux-i586.bin) is now available. You can download the file from Java SE Downloads page. Java SE 7 (JDK 1.7) Binary Snapshot build b132 also has been released. If you want to download and install the Java SE 7, you can get the file from Java SE 7 download page with the file name jdk-7-ea-bin-b132-linux-i586-03_mar_2011.bin. This tutorial should be applicable for those version.
1. Download the JDK
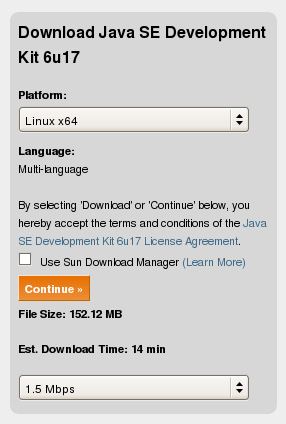
The JDK can be downloaded from its official website. At the time this tutorial was written, the JDK version is JDK 6 Update 17. Click the Download button then you will be forwarded to Java SE Download page. You can select the Java platform to suit your system.

Since I use x86_64 of Linux, I choose ‘Linux x64’ for the platform. Then click ‘Continue’ button. You can skip for the ‘Log in for Downloads’ optional window. Then select from the available files.
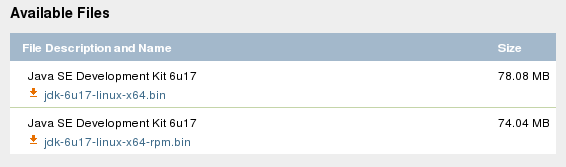
Choose not the ‘rpm’ file because we will install the JDK in a folder as we want to.
2. After the download is complete, unpack the file by executing it.
First you have to make it executable.
[fuad@centos Downloads]$ chmod +x jdk-6u17-linux-x64.bin
[fuad@centos Downloads]$ ./jdk-6u17-linux-x64.bin

  inflating: jdk1.6.0_17/README.html
   creating: jdk1.6.0_17/include/
  inflating: jdk1.6.0_17/include/jni.h
   creating: jdk1.6.0_17/include/linux/
  inflating: jdk1.6.0_17/include/linux/jawt_md.h
  inflating: jdk1.6.0_17/include/linux/jni_md.h
  inflating: jdk1.6.0_17/include/jvmti.h
  inflating: jdk1.6.0_17/include/jawt.h
  inflating: jdk1.6.0_17/include/jdwpTransport.h
  inflating: jdk1.6.0_17/include/classfile_constants.h
  inflating: jdk1.6.0_17/COPYRIGHT
Creating jdk1.6.0_17/jre/lib/rt.jar
Creating jdk1.6.0_17/jre/lib/jsse.jar
Creating jdk1.6.0_17/jre/lib/charsets.jar
Creating jdk1.6.0_17/lib/tools.jar
Creating jdk1.6.0_17/jre/lib/ext/localedata.jar
Creating jdk1.6.0_17/jre/lib/plugin.jar
Creating jdk1.6.0_17/jre/lib/javaws.jar
Creating jdk1.6.0_17/jre/lib/deploy.jar

Java(TM) SE Development Kit 6 successfully installed.

Product Registration is FREE and includes many benefits:
* Notification of new versions, patches, and updates
* Special offers on Sun products, services and training
* Access to early releases and documentation

Product and system data will be collected. If your configuration
supports a browser, the Sun Product Registration form for
the JDK will be presented. If you do not register, none of
this information will be saved. You may also register your
JDK later by opening the register.html file (located in
the JDK installation directory) in a browser.

For more information on what data Registration collects and
how it is managed and used, see:
http://java.sun.com/javase/registration/JDKRegistrationPrivacy.html

Press Enter to continue.....

Done.
A folder ‘jdk1.6.0_17’ will be created.
3. Move the ‘jdk1.6.0_17’ folder to a safe place
We will move this folder to a place as you want to. You can move it to /opt folder, leave it in this directory or to anywhere in the system. I prefer to move this folder to /usr/local. So move it there.
[fuad@centos Downloads]$ sudo mv jdk1.6.0_17 /usr/local/
Here in the /usr/local/ directory, we will create a symbolic link to jdk1.6.0_17 named as ‘java’
[fuad@centos Downloads]$ cd /usr/local/
[fuad@centos local]$ sudo ln -s jdk1.6.0_17 java
Now the JDK is installed in /usr/local/jdk1.6.0_17 and linked to /usr/local/java.
We need to add /usr/local/java/bin folder to the system PATH. If it is only for your account, add it in .bash_profile file in you home directory. In Slackware, it should be in .profile file. To make it system wide environment, add it in the /etc/profile.
Edit a line in .bash_profile to be similar like below:
PATH=$PATH:$HOME/bin:/usr/local/java/bin
This way the PATH will be automatically set at boot time.
You can also set the PATH immediately by using a command below:
$ export PATH=$PATH:/usr/local/java/bin
Now you can call java directly in your shell:
$ java -version
java version "1.6.0_17"
Java(TM) SE Runtime Environment (build 1.6.0_17-b04)
Java HotSpot(TM) 64-Bit Server VM (build 14.3-b01, mixed mode)
4. Upgrade to the latest version
If there is a new JDK version released by Sun/Oracle and you want to upgrade to the latest version, you can simply follow the steps above. Except for the third step, after moving the new JDK version to /usr/local/ folder, you need to remove the existing ‘java’ folder in the /usr/local/ directory and re-create the symbolic link again.
For example, today on May 18th, 2010, I checked to the java.sun.com website that the current latest version of the JDK is JDK 6 Update 20. So after following step 1 and 2, we remove the ‘java’ folder and re-create the symbolic link again to the ‘java’ folder.
$ sudo rm -rf java
$ sudo ln -s jdk1.6.0_20 java
To make sure it has been successfully upgraded, you can check the current java version.
$ java -version
java version "1.6.0_20"
Java(TM) SE Runtime Environment (build 1.6.0_20-b02)
Java HotSpot(TM) Server VM (build 16.3-b01, mixed mode)
To get more detail about installing JDK on Linux (CentOS), watch the video below!
I also just used this and found it very useful. Thanks.
thanks…it’s amazing there aren’t more tutorials on installing non-open java on CentOS for us poor saps forced to use Oracle’s version.
And since Oracle has blocked wget it adds just one more step.
Thanks!
Thanks mike for stopping by. Glad to hear that it is useful though this tutorial is almost 4 years old :)
Thanks for installation process, but it temporary works after logoff and login again java doesnt work
Hi, you need to add the PATH to .bash_profile (CentOS, RedHat) or .profile (Slackware) so it will execute the PATH at boot time.
Great,.Thank you so much
Thank you.
thx man….. its very helpful .
Worked like a charm running Slackware 13!! Thanks so much for this tutorial.
Hi – Thank you for this. It worked great. Using CentOS on VPS
Thanks,
its work and helpful.
It is very helpful. Finally I find the tutorial that gives detailed step by step instructions
Thanks for stopping by
Thanks a lot!!!!
I had been through 10 tutorials to install java in linux and nothing worked. But yours worked perfectly. However, i did encounter a problem in moving the jdk folder using the steps. I had to add my username to the wheel group and then proceed again. Hope you refine the process by adding a note to that effect.
Thanks Again,
Salman
Very glad if it is helpful and many thanks for your feedback.
I just assumed that you own the box and you have full access to the system so your username can do su or sudo meaning that your username must be a member of the wheel group.
What's the Linux distro are you using?