In this article I want to share to you on how to create and configure vlan on Linux through Cisco Catalyst Switch.
Requirements:
1. Linux installed on a PC with one or more NICs (Network Interface Card). I use Centos 5.4 using 2.6.18-164.11.1.el5PAE kernel. It should be applicable on other Linux distros such as Slackware, Ubuntu, Fedora, Debian, etc.
2. Cisco Catalyst Switch 2950
3. 2 PC/Laptop running Windows/Linux/BSD/MacOSX
4. 3 straight cables
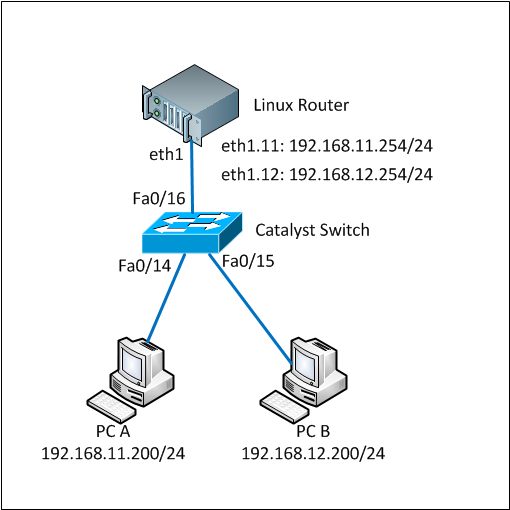
This tutorial is based-on network diagram below:

Here are the full steps.
1. Load 802.1q module into the system
By default the 802.1q module is not loaded so we firstly have to load it. You can check whether it is already loaded or not by using ‘lsmod’ command.
lsmod |grep 802
If there is nothing shown by lsmod command, it means the module has not been loaded yet. Run ‘modprobe’ to load it.
modprobe 8021q
Make sure the module was successfully loaded by running the ‘lsmod’ again
lsmod |grep 802
8021q                  24649  0
If you see something similar like above, the 8021q has been successfully loaded.
2. Create vlan interface
We will use eth1 interface in the Linux box. We have to bring the interface up without IP address assigned to it before we can use it.
ifconfig eth1 0.0.0.0 up
We will create interface vlan 11 and vlan 12 on this eth1 interface. To create a vlan interface, use ‘vconfig add’ command as below:
vconfig add eth1 11
Added VLAN with VID == 11 to IF -:eth1:-

vconfig add eth1 12
Added VLAN with VID == 12 to IF -:eth1:-
These commands above will create devices eth1.11 and eth1.12 to your system. Linux will consider these as another network devices so you can configure and assign IP address like other.
You also see the vlan interfaces by typing ‘ifconfig -a’ command.
ifconfig -a

eth1.11   Link encap:Ethernet  HWaddr 00:30:48:BF:4E:BD
          BROADCAST MULTICAST  MTU:1500  Metric:1
          RX packets:0 errors:0 dropped:0 overruns:0 frame:0
          TX packets:0 errors:0 dropped:0 overruns:0 carrier:0
          collisions:0 txqueuelen:0
          RX bytes:0 (0.0 b)  TX bytes:0 (0.0 b)

eth1.12   Link encap:Ethernet  HWaddr 00:30:48:BF:4E:BD
          BROADCAST MULTICAST  MTU:1500  Metric:1
          RX packets:0 errors:0 dropped:0 overruns:0 frame:0
          TX packets:0 errors:0 dropped:0 overruns:0 carrier:0
          collisions:0 txqueuelen:0
          RX bytes:0 (0.0 b)  TX bytes:0 (0.0 b)
3. Assign IP address to the vlan interfaces
The vlan interfaces were successfully created on the previous step. Now we assign IP address on those interfaces using ifconfig command as below:
ifconfig eth1.11 192.168.11.254 netmask 255.255.255.0 up
ifconfig eth1.12 192.168.12.254 netmask 255.255.255.0 up
Make sure that the IP addresses were assigned successfully on the interfaces.
ifconfig eth1.11
eth1.11   Link encap:Ethernet  HWaddr 00:30:48:BF:4E:BD
          inet addr:192.168.11.254  Bcast:192.168.11.255  Mask:255.255.255.0
          UP BROADCAST MULTICAST  MTU:1500  Metric:1
          RX packets:0 errors:0 dropped:0 overruns:0 frame:0
          TX packets:0 errors:0 dropped:0 overruns:0 carrier:0
          collisions:0 txqueuelen:0
          RX bytes:0 (0.0 b)  TX bytes:0 (0.0 b)

ifconfig eth1.12
eth1.12   Link encap:Ethernet  HWaddr 00:30:48:BF:4E:BD
          inet addr:192.168.12.254  Bcast:192.168.12.255  Mask:255.255.255.0
          UP BROADCAST MULTICAST  MTU:1500  Metric:1
          RX packets:0 errors:0 dropped:0 overruns:0 frame:0
          TX packets:0 errors:0 dropped:0 overruns:0 carrier:0
          collisions:0 txqueuelen:0
          RX bytes:0 (0.0 b)  TX bytes:0 (0.0 b)
Until this step, creating and configuring vlans have been done on the Linux box. Now we are going to configure vlan and trunk on the Cisco Catalyst switch.
4. Configure cisco catalyst switch, add vlan database, configure interface access vlan and trunk
As said before, we use vlan 11 and vlan 12 on this tutorial. So those vlan must be added into the vlan database of the switch.
switch#conf terminal
Enter configuration commands, one per line.  End with CNTL/Z.
switch(config)#vlan 11
switch(config-vlan)#name test-vlan11
switch(config-vlan)#exit
switch(config)#vlan 12
switch(config-vlan)#name test-vlan12
switch(config-vlan)#exit
switch(config)#exit
switch#wr mem
Building configuration...
[OK]


switch#show vlan | include test-vlan
11   test-vlan11                      active
12   test-vlan12                      active
Vlan 11 and 12 have been successfully added to the database and active.
Now we have to configure 3 ports in the cisco catalyst switch. 1 port is for trunk between the switch and Linux box and 2 ports are for PC-A and PC-B.
We will use port Fa0/16 as trunk port and Fa0/14 and Fa0/15 as vlan access port connected to PC-A and PC-B respectively. Below are the commands:
switch#conf terminal
Enter configuration commands, one per line.  End with CNTL/Z.
switch(config)#int f0/14
switch(config-if)#description To_PC-A
switch(config-if)#swi acc vlan 11
switch(config-if)#no shutdown
switch(config-if)#exit
switch(config)#int f0/15
switch(config-if)#description To_PC-B
switch(config-if)#swi acc vlan 12
switch(config-if)#no shutdown
switch(config-if)#exit
switch(config)#int f0/16
switch(config-if)#description Trunk_To_Linux_Router
switch(config-if)#switchport trunk allowed vlan 11,12
switch(config-if)#switchport mode trunk
switch(config-if)#no shutdown
switch(config-if)#exit
switch(config)#exit
switch#wr mem
Building configuration...
[OK]
switch#


switch#show running-config interface f0/14
Building configuration...

Current configuration : 82 bytes
!
interface FastEthernet0/14
 description To_PC-A
 switchport access vlan 11
end

switch#show running-config interface f0/15
Building configuration...

Current configuration : 82 bytes
!
interface FastEthernet0/15
 description To_PC-B
 switchport access vlan 12
end

switch#show running-config interface f0/16
Building configuration...

Current configuration : 129 bytes
!
interface FastEthernet0/16
 description Trunk_To_Linux_Router
 switchport trunk allowed vlan 11,12
 switchport mode trunk
end

switch#
The configurations on both Linux box and Switch have completed.
Now it is the time to test whether PC-A and PC-B can ping to the same network on the Linux box. Make sure the cables are connected properly to each ports on the devices.
5. Test ping to Linux box using vlan ip address
Test from PC-A:
C:\Users\Fuad NAHDI>ping 192.168.11.254

Pinging 192.168.11.254 with 32 bytes of data:
Reply from 192.168.11.254: bytes=32 time=1ms TTL=64
Reply from 192.168.11.254: bytes=32 time
Test from PC-B:
C:\Users\Fuad NAHDI>ping 192.168.12.254

Pinging 192.168.12.254 with 32 bytes of data:
Reply from 192.168.12.254: bytes=32 time=2ms TTL=64
Reply from 192.168.12.254: bytes=32 time
6. Make everything active at boot
Everything we have done above is temporary configuration, meaning that it will be cleared from configuration when we reboot or shutdown the linux box.
To make it permanent or active at boot, simply add the following lines into the rc.local file (e.g Centos: /etc/rc.local ; Slackware: /etc/rc.d/rc.local):
modprobe 8021q
ifconfig eth1 0.0.0.0 up
vconfig add eth1 11
vconfig add eth1 12
ifconfig eth1.11 192.168.11.254 netmask 255.255.255.0 up
ifconfig eth1.12 192.168.12.254 netmask 255.255.255.0 up
Everything has been done. Now you should understand on how to create and configure vlan on Linux and Cisco Catalyst switch.
If you find this tutorial is helpful please kindly share to others.
test the configuration but the linux server allow pass the traffic between networks, I solve with iptables or how would you do??
thanks for this article very helpful.
also see this link for vlans from tek-tips,
http://cisco.nosle.com/sfn/mth/v/h/www.tek-tips.c…
If you want to compare Cisco Catalyst switch with Juniper switch try this website.
Regards,
Bob
excellent help
yes it helped me a lot to understand vlan configureation on linux box
thank you again
That's excellent document, i was exactly looking for this scenario.
Thank you so much
You are welcome :)
Hi, i am from colombia and i wanna do the same but my SW is a dell powerconect 6224, i configured all like you say but is not working perfect, cant you help me please
Hi, I never touch the powerconnect 6224, however I already wrote a tutorial for dell powerconnect 3024 at http://www.techonia.com/vlan-trunk-dell-powerconnect-3024.
Based on the docs, the PC 6224 is much like cisco catalyst switches in the command line interface. A basic discussion found in dell community may help you http://en.community.dell.com/support-forums/network-switches/f/866/p/19338109/19718532.aspx
I really appreciate your post about vlan on Linux with switch 2950. I have been implementing this for last 2 years.
Now i need to add wifi in my configuration.
My problem is the AP for wifi, i use does not support DHCP configuration on it.
Does it possible to add DHCP on switch 2950,
Yes, i can configure DHCP on Linux 5.2, that i have been using.
Hope for usefull reply
Thanks a lot. I had been in the office struggling to understand VLAN configuration over Linux and you made it simple. Thanks again.
Great post, great article, but the way you are offering to create the vlan makes it temporary and it will disappear from configuration seconds after reboot (or shutdown of your linux box).
I think it would be worth to explain how to store it in a config file so that it remains active after reboot, what is from my point of view the most interesting case.
Excellent feedback. I just added (point 6) to the article above on how to make it permanent configuration or active at boot.
Thanks Pierro.